Thursday, August 09, 2007

Tidbits !

Been caught up lately getting ready for shows that are coming up. Some really good things have happened recently. The large painting of "Farm Near Dunes, Guadalupe" won 2nd place in the Carpinteria show. Then on the day we were to pick it up at the end of the show I got a call that we needed to leave it there so a woman could come in to look at it again...well, she did and then bought it for her husband! SOLD!!! Tghat show also had a pretty well known Plein Air artist from Santa Barbara judge the show and I guess I'm doing something right because I had 2 pcs juried into it. So that got me pumped too.


The 2 pcs I took down to enter in the new show both made it in which is really cool because that show was judged by Arturo Tello, whose work I have seen and like a lot. Although the gallery is small down in Carp and they are just starting to have these show they are super organized and the quality of art is pretty high. Plus, the people putting on the show are great.


Tomorrow night is the reception for the new Carp show and the buyer of the painting said she will be there so I'm looking forward to meeting her husband who really liked that painting. On Saturday night I will be up in Morro Bay at the Artist Reception for the Natonal Show there...I was lucky enough to get 1 pce juried into that show too this year. Yahoo! They have some awesome art that gets into that show so I'm looking forward to seeing this years entries.


If that wasn't enough, the gallery owner up in Edna Valley called me and let me know she sold 2 of my paintings! Too cool! I need to get new work up to here to replace the ones we sold...and that's going to be ok since I've been painting like crazy for a show in December at the Los Olivos Cafe. They have 1 artist's work in there per month and mine is at the height of the Christmas shopping season. When it rains it pours! I'm keeping my fingers crossed I make at least 1 sale that month up there. Thinking of more sales will only jinx me!


Lastly...I'm scheduled to be the Featured Artist in Morro Bay in January so that's coming up too. I don't expect many sales from that show because we have only sold 1 painting there in the year we have been in there. I think it's a case of too much art and nowhere near enough customers. Each time I work a day up there I rearly get more than 5 people in the whole day of sitting the gallery. I have to admit though, art sales have been dead slow all year so far and I'm sure they aren't immune to that. They have a killer gallery and some of the nicest people I've met since getting into the art scene up here.


I hate to post without including a photo so here is one at a small outdoor show we did over the 4th of July holiday. That table there is filled with old battered American flags that will be bruned in a ceremony to dispose of them properly...they even had troops in dress blues from the local Airbase to officiate. VERY COOL!


By the way, I met a man and his wife there who bought 2 small paintings of mine for their new home they plan to retire in a few years. More good news!

Other than that, I've been making my own canvas covered panels to paint on and painting as fast as I can...nothing like a deadling to get you motivated!

Saturday, July 07, 2007

2nd Place!

"Farm Near Dunes, Guadalupe"
15"x30" Oil on Canvas

Well, the artists reception has come and gone for the "Calif" show in Carpinteria. One of my paintings, "Farm Near Dunes, Guadalupe", garnered the 2nd Place award. It was a great night once we got there.....took forever due to Santa Barbara traffic!

I learned some more lessons on pricing my work last night too. I always keep my eye on prices at shows comparing work and what other artists charge. If you want to get a feel for what you should be charging for your work go to art shows. It's too hard to judge the art online and seeing it in person gives you a better idea of what is close to your quality of work. Then compare the prices to your prices. Keep in mind the odd artist who feels that asking for the moon is going to validate their work as superior.....there is a lot of that going around. I saw a piece last night that was absolutely horrible. The artist was asking over $1000 and got it half way through the show....makes you want to cry after you quit laughing!

Anyway, when I woke up this morning I thought to myself that painting art is so much easier and less frustrating than trying to promote and sell it. At shows, I always have this feeling of being looked at as this desperate person trying to whore-out myself to make a sale. I counter that feeling by almost ignoring my art and keeping away from it so as not to look like that person. People say get over by your work, someone is looking at it...go talk to them. I hate doing that. I do it but I really hate doing it.

Thursday, July 05, 2007

"Calif" Art Show


The coastal city of Carpenteria is host to the Carpenteria Valley Arts Council. A while back they purchased a small house on a downtown lot and planned to rebuild making it into their Arts Center and Gallery. To help with the costs they have been having art shows. I was lucky enough to get 1 of my pieces juried into the 1st show they had a few months ago. Last Friday I took 2 paintings down for their "Calif" show that is running now ( June 30 - August 4, 2007). This show is a mix of California scenes and I was blown away when both pieces I entered where juried into the show. Too cool!!

The show was juried by Santa Barbara artist Michael Drury. Michael is a Plein Air Landscape painter who studied and painted with legendary California artist Ray Strong . Having 2 paintings juried into the show by Michael Drury is really quite an honor for me. I'm miles behind someone of his talents but the fact that we are painting California scenes that are not the typical tourist scenes really makes me feel I'm on the right track with my own work.

This Friday, July 6th, is the Artist Reception from 5:30 to 7:30. If you're in the area you are more than welcome to come by. It is at 855 Linden Ave, Carpenteria, CA. Their phone number is 805-684-7789.

Sunday, July 01, 2007

Making Canvas Panels

I've painted on stretched canvas, painted on panel and painted on canvas covered panel. All 3 of these types of support have totally different feels to them. I have found that I like certain qualities in each support. Stretched canvas is probably my favorite for the ease of blending on canvas (doing skies) and it's lightwieght charactaristic....but stretched canvas it expensive. I used to paint on Masonite panels in college and loved the finished look of paint on masonite. I mostly love the price per panel you get from cutting your own panel from a large sheet.
The next best thing is to cover the masonite panel with canvas glued on. I bought some panels from Ray Mar that are canvas covered and enjoy painting on those but they get pretty pricey. I decided to just make some. I didn't take a lot of pics along the way here but here are some pics that I did take.....
Seen here are 3- 12"x24", 2- 10"x20" and 1 9"x12" panels. I also cut another 12"x24" and a large 12"x36". All of these panels were cut from 2 sheets of masonite I bought at Home Depot for less than $4.00 per sheet. That's $8.00 and I cut 8 panels. Dick Blick sells 12"x24" canvases for about $18.74 each so that would have cost me $74.96 in that size alone. You can see the cost savings of painting on masonite. OK, I bought the roll of canvas too but that was about $26.00 for 6 yards of canvas....but that's that's 64 inches wide and 18 feet long...that's going to cover a lot of panels. One of the 10"x20"'s is flipped over to that back so you can see the dark side of the rough back. I sand the front before gluing on the canvas.
Here is the wide 12"x36" I finished and seen here with only 1 coat of gesso. I put on 3 coats. You cut your panels to size, sand the front surface, apply glue with a foam brush and then lay your canvas on top, smooth it flat. When it's dry enough I flip it over and glue the excess canvas to the back. On the panels I haven't finished I'll try trimming the canvas flush with the edge to see how that comes out...that will be exactly how Ray Mar does their panels. I was going to glue with Acrylic Medium or Acylic Gel but then I read an article online about an art teacher who used Mod Podge to do his panels. It costs about 1/3 what Acylic Medium or Gel costs and dried the canvas rock solid to the panels. Mod Podge worked so well that I don't think I'll have a problem trimming the edges. Mod Podge also has an Acid Free version so get that if you can find it although I'm not sure it would be neccesary, you will gesso the canvas after the glue has dried.

Here you can see how I folded the canvas wrapped around to the back. The dark area is where the glue was applied. The folded over canvas adds some thickness to the edges so I'll try trimming the canvas flush with unfinished ones. Here is a shot of the texture of the canvas after final gesso has been applied. Very much like the Ray Mar panel surface so I'm happy.The Masonite I purchased was Tempered Masonite as opposed to Un-Tempered Masonite. If you can find untempered masonite buy it and use that. Tempered masonite is impregnated with oils so it stands up to outdoor usage. People worry about the oil coating getting to the paint. The bulk of the oil is really on the surface so sanding takes off most of the oil coating. I am covering it with the glue and the canvas and the final coats of gesso so the oil in the board is not going to effect the painting at all, but, get untempered masonite in case you decide to paint on the masonite without covering your panel with canvas. I plan on covering all of my boards with canvas so tempered masonite was ok for my purpose.

I used a table saw to cut my boards but you can do it with a metal ruler and an exacto knife with new blades, just takes longer to cut. If you don't have a table saw find someone who does because it's so much easier. These are big panels so get the thicker masonite of you plan on doing larger sizes. When I glued the canvas to the front the board warped (bowed) some but after applying the glue to the backside it straightened out completely.

Larry Seilor and Marc Hanson have written great articles on WC for making panels and I think you will enjoy reading both processes. I could get in more detail on this but their articles cover it all completely but this is basically how I did it and you can do them as you like. It's not rocket science, don't make a big thing out of it.....

Recap...

Cut tempered or untempered masonite to size.

Glue canvas to panel using Acylic Medium, Gel or Mod Podge.

Prime with gesso front (and back if you like).

Buy an ice cream with the money you are saving and Get Painting!

Wednesday, June 27, 2007

Juried In!

"Nipomo Skies"
12"x24" Oil on Canvas

Just got the news today that one of my paintings, "Nipomo Skies", was juried into the Central Coast National Fine Art Competition...this is my 2nd National show acceptance. Too cool !!! I have said it a hundred times, you never know how a judge chooses what they do in Juried shows. This judge continues the tradition. The other painting I entered was what I was thinking would get in if any got in but it was my second choice that made it into the show.
I made it into last years show with my pen & ink stippled drawing of a Coast Guard cutter. Didn't win any awards with it but it was nice just getting into the show...especially with a pen & ink drawing at the National level! They had some great paintings in last years show. Artists Richard Green, Ed Terpening, Marilyn Lucia-Bowsfield and Ann Brown were just a few whose names I can remember. Just getting into a Juried National show is a big thing for me. Winning anything is something I don't dwell on at this stage in my painting....if you had seen last years show and the quality of the work you'd understand.
Anyway, here is the post card for the show. They are having a Champagne Preview Gala the night before the Artist Reception for buyers who want an early crack at it. I've decided to keep my price to my normal price ( $600.00) instead of raising it for the show and their commission. I did this at the last Juried Show I was in at San Luis Obispos' Art Center and that piece sold on opening night. This is a really low price for this show so we will see what happens.
If you are going to be in Morro Bay, CA on the 10th or 11th of August come on by....

Tuesday, June 19, 2007

Building a Show Easel

These are very cool easels with zip setup time. They cost a bit so I decided to just build one. I have seen them so all I did was just roughly sketch it out and guess at the angle. I purchased 1"x4" oak at Home Depot for $30.00, 2 brass hinges, 4 Shaker pegs to hold 2 paintings and 4 padded feet. I also bought some dowels for the corner of the wood strips and some gel epoxy glue with 1000lb pull strength.

I tapered all the wood strips on a table saw, drilled the holes for the dowels and then mixed the epoxy gluing the two halves together. I let them dry overnight and then sanded a radius on all the edges which gives it a nice rounded edge to grab when carrying. I drilled holes for the pegs, the feet pads and then screwed in the hinges. When all of that was done I rubbed it with a wax/sealer which brings out the beauty of the oak.

It will hold two paintings, looks cool and is easy to setup...and cost very little. It's a great indoor easel and will look good in my house too.

2 pcs cut at 5"6 and one pc for the floor strips.

The wood is tapered and then ready for the dowels and epoxy.

I used a rubber "stop" to set how far down I drilled the holes for the dowels. I used these metal pcs with points in the drilled holes, put the two pcs together and it marks where I need to drill on the other piece of wood. Drill all holes, fill with epoxy insert dowels and put them together.

After sanding, this is what the corners will look like...note the footpads installed.


Here it is all oiled up ready for the art. You can see the Shaker pegs for holding the framed artwork. The two brass hinges go at the very top and at the very bottom in back. A very simple easel to build.
Here it is in the house with 2 paintings. The wood looks great with a natural oak finish protected with the oil rubbed into it. The feet are screwed in and allow for adjusting to uneven surfaces. Right now, the Shaker pegs can be pulled out to very the positions of paintings but I might just go ahead and glue them in place. I know a lady who mentioned she had lost a peg because they kept popping out. We'll see.

Garden Tour

We had a pretty good show, slow day but a good show. I say good because we had no wind, no troubles and all of the artists had great setups and very good art. Also, Jean, whose house I was invited to show at, had an awesome yard to show art and she and her son and hubby went all out to give us a cool place to setup. First Rate! And, most importantly, we all had a fun time that day doing out thing with lots of laughs.


I'm learning that selling art at a fair type of event means you are not going to sell large expensive pieces as much as you are going to sell small items under $100.00 such as mini pieces, notecards, matted prints (not framed) etc....In the desire to not lug a ton of stuff to this show I stupidly didn't take enough prints of various subjects and I have no small prints of my paintings at all yet...will I ever learn!? I sold 2 prints for the entire day but had lots of fun with my fellow artists. Some shows are like that but I did learn about what I need to add to my display at small art shows. I'm going to get better at this if it kills me! hahahaha.

Here are some photos of the day....

My setup....My umbrella went up when the sun came out....hint, keep your shrink-wrapped art out of the sun or it will sweat ruining your prints. I always cover mine in shade no matter what!Jean's setup....this girl was out to make money!
Syd's setup...customers already lined up blocking my shot. Another artist ready for raking in the cash! I waited to get a clear shot of the backyard littered with ART....what great setups and killer work all around....Lots O' Art.Jean's yard is so tropical looking and she has great grass. I live on a hillside and have Native grass which means once summer rolls around we have brown grass!
Check out Syd's easel on the right hand side...her hubby made these out of garden lattice bought at Home Depot, super light to carry and worked great. Note the excellent setup of smaller items under $100...an artist on the ball! How proudly she stands! I was working with art sale veterans that day!


Here is what my view of Jean's area looked like most of the day...customers customers customers. She did really well and it goes to show that planning pays off. Jean is totally a veteran of selling art and knows what the heck she is doing....how do I know this?, because I had to help her pack some of her sold paintings! I'm doing another show thatJean is in charge of later this month so I'm going to gear up with things I've learned here and hope for a better day.


Friday, June 01, 2007

Small Works Painting


I'm going to be participating in a Garden Tour show. These are shows that Guilds have where artists show some of their works in the backyards of various artists homes. Usually there are about 3-6 artists at each of the homes. The guild sells a program that includes a map to each home and you have the have the program to get in. Each program allows 2 guests to enter to see or buy the works of the artists. It's a nice way to meet potential customers and in general have a good time joking about the lengths you'll go to sell your work! hahaha. If you don't have one of these in your area get one started...they are actually pretty fun.


This is one of the small paintings I did a few weeks ago...took less than an hour to do. I want to show some normal sized works and felt like doing some smaller works...much easier to carry to the show. I was in a framers shop and he wanted me to buy some small 5X5 frames he had laying around but I didn't have any 5X5 canvases...so, Gary the framer just happened to have a boatload of them so if I bought the small frames he'd give me the canvases for each one....not a bad deal eh? I picked up a couple and this was the first one painted.


I quickly cropped a reference photo into a square image a this is what happened. Here it is in the small frame for it....


Shell Beach Rocks


I did this one recently in order to get better at painting rocks along the California coast. I don't do many scenes with rocks in them so this was a good project for me. I wish I had a smaller knife to use in this one...the 2 that I have are really large and the really small one I had at one time is lost to history. I'll have to pick one up before doing another rock scene.

Anyway, this is the result of the rock project.

"Shell Beach Rocks"

12"x24" Oil on Canvas

Monday, May 28, 2007

Yard Sale Plein air

Catchy title eh? We had a yard sale Sunday and Monday of Memorial weekend. Spent all day Sunday twitling my thumbs do to the thousands who came by...I can count them on 2 hands. I decided I wasn't going to do that over again on Monday so I brought out my plein air rig and went at the neighbors tree again. If I paint enough versions of that one tree I'll be able to piece together a forest show.

The sky was pure blue and not a cloud in site so I messed with it a bit to throw in some interest. Naturally, the only people who came by and saw it were when it was in the early stages and didn't look like much. I did meet a lady who paints but is busy raising her son and doesn't have the time to join our local Guild...I don't know why but I always seem to be making the sales pitch for the Guild to get more artists to join it.

Here is the scene and my set-up....I've got my sky in there and the tree. I'll leave out the water tank and pine trees to the right.

And here is a shot while continuing on....I wiped in the sky and then added the tree. I then wiped in my foreground dirt and grasses area and now proceeding to add bushes from left to right aross the canvas.

And the fnished piece. I probably spent about less than an hour actually painting it but it was spread out talking and eating lunch. A little 6"x8" Oil on Ray Mar panel.

Sunday, May 27, 2007

Central Coast Skies

This scene is really close to another I did titled "Nipomo Skies". It's the same general area and the ref photo taken the same day too. I'm calling it was it is because it is a pretty fair depiction of the skies that I see a lot in spring in the Central Coast area of California...


This one is really large, an 18"x36" stretched canvas. Had to do some large pieces sooner or later so the time was right for this one. I have some shows coming up too that I'm trying to get ready for so larger pieces will help there with the limited number of paintings I have so far.

"Central Coast Skies"

Anyway, lots of sky here and a nice wide view of the Central Coast near Nipomo, Califronia. Fields a plenty!


Wednesday, May 23, 2007

Framed Vineyard Scene

Art always looks better once it's framed...ALWAYS! Have you ever worked on a ppainting that, no matter what you tried, it just looked less than what you set out to paint? I've had a couple of those so far. Then for fun I'd set them in various frames and oddly enough one would make the painting look better than what it finished up as. Art always looks better framed!

I painted this vineyard scene and was pretty happy with the results. Since there was a lot of reddish tints here from the late afternoon sun setting I figured a frame with some red in it would look cool. Red...to me that means natural wood, not red stain. I looked around at various online frame sites but it's really hard to see it framed that way. I went to my local framer who had this moulding and had it made up. 3 days later I was amazed how much better this painting looked framed.


Yesterday I delivered it to a small vineyard gallery that represents my art and the owner was only too happy to take this one on board. If it sells it will become one of those paintings that you wish you had entered in shows or at least showed around to your painter friends first! I don't have enough paintings yet to keep certain ones to do just that.

Right before loading it up in the car I took this picture to make sure I at least had this to show here on my blog. I have been staying away from getting Giclee's made of my work until I feel I am cranking out really good work. One of these days that is going to happen.

Monday, May 14, 2007

Painting Clouds Part 1


I like painting clouds...I'm getting better at it too. How do you get better?...paint lots of clouds. I'm not the expert but then again I've been told by my friend and fellow painter Margaret that you can't really do them wrong because they can look so many ways...good advice. I thought I'd post various versions of clouds as new paintings roll out so this is the first in a series on painting clouds for those interested.

The clouds I'm painting here were stormy grey clouds with a nice wind up there blowing them across the mountains....not big cumulus clouds, more like stretched out cumulus clouds. Blue skies are breaking through in parts of the scene so we need light from the sun on top of the clouds and dark ominous shadows underneath the clouds.

Above is my reference photo I'll be working with. I'm not painting the entire sky here fro compositional reasons but you'll see the area we are going to paint as we go along....
Remember, you can click on these images for larger views

Colors used : Titanium White, Ultramarine Blue, Alizarin Crimson.

Step 1...I'll sketch in my details of the ground area. I leave the sky pretty empty except maybe to map out some complicated clouds. I mix up lots of White with a little UBlue and paint in my upper blue skies. Once it is blocked in I add more white to the mix and fade the lower portions of the blue skies to where the upper clouds will begin. You dont' have to be accurate here at all...when blending colors later the less intense blue blends better with the white of the clouds.
Here is a closer detail of this
Step 2...We now mix up white with just a dab of Alizarin and a dab of UBlue for a light pinkish blue mixture for the lighter shades of the clouds. Before blocking in this mixture I add pure white to areas of the clouds where I want the brightest highlights. Then I paint in my pink mixture, again you don't have to accurate here, just block it in the general areas.
Step 3...Before we convert that mixture to the darks for the clouds we grab some to keep seperate for blending later. Here you see my sky blue mixture, the light pinkish mix and the blob I am saving at the top of the palette.


Now I darken my original mixture with more Alizarin and UBlue (SAVING MY BLOB for later)We now paint in the darks of the clouds and get happy because we are almost to the blending stage....

Some areas are lightly painted in to create the shapes of the upper cloud areas...gives it that billowy-puffy look called "Shape" in art lingo.

Step 4...Now we get out a fan brush and begin blending. Just sweep your fan in an X pattern brushing once across the canvas and then the opposite direction across the canvas...do this till the edges blend. If some of the edges don't blend easily dab in some of the Saved Mixture of lighter pink to the edge and fan again in that spot....that's why you save some of this mixture. Fan until it looks COOL! You will have to be the judge of what looks cool to you but you'll find it. I have faith in you. Here is my version of cool....A detail of the blended version....Step 5... I basically finish the painting, the ground area to let the sky have tme to set up a bit. The last thing I do is go back into the sky area and add some darker wisps of clouds over the rest to give the clouds a more 3 dimensional look to it. Just dab some random dark paint and then blend lightly.Here is my finished painting with the ground area completed.....

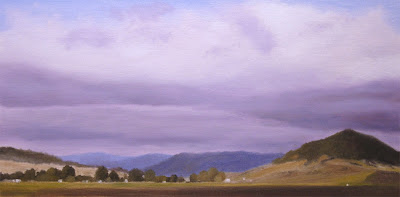
That's basically it....stay loose, play with blending until you like your results...if it goes bad just add more paint the the areas you blended too much and blend again. If you don't have a fan brush go get one...wipe it off as you blend in different ares that are critical of color...you don't want to start blending a white highlighted area with a fan brush still loaded with your darks on the brush.

Good luck with your clouds and have fun making them!

Thursday, May 10, 2007

What's Your Opinion....


I've touched this painting up since thinking I was finished with it a month or so ago. I thought the foreground highlighted trees didn't have enough light, or glow, caused by the low setting sun across the valley. The tree tops are illuminated because the lower half is shaded by the hill I was standing on while taking the reference photo. I've gone back in and brightened them and also added some light to the mid ground valley area to suggest it is also highlighted by the setting sun.


What I want to know is if you think this light on the tree tops works here. Too bright, not bright enough or if it just doesn't look right to you...I like the idea of just a stab of light hitting something and thought it would work well here.

Here's a detail of the tree area. I also added some branches to the trees...something I rarely do with my trees. I'm not sure why but they look pretty neat once in a while.

Saturday, May 05, 2007

Working the Gallery


One of the places I show my work is at the Morro Bay Art Association Gallery in Morro Bay, about an hour and a half north of where I live. As part of the deal there you must work a 4 hour shift each month while the show is on that your work is entered. 4 hours is not a lot of time if you live in or near Morro Bay but for me it becomes and all day thing doing it. 3 hours drive time plus getting ready to go up there. I make the best of it by using the drive to collect reference photos for future work.

The good part of artists working the gallery is it keeps costs down to run the Guild or Association gallery....the bad part is that not every artist is a good salesperson...which is the goal of the gallery, selling the art created by the artists members. I would say at least half of the artists I know are pretty shy, introverted people....not the type who commonly get jobs as salespeople. Another downfall to having the artists do the selling is that most of us don't know each other, we don't know what type of work we all do nor anything about the specific works in any one show.

I've had someone call me at the gallery and say "I'm calling about John Doe's painting of the horse and wondering if he has any other works there?"....Naturally, with about 50 members I don't know a John Doe, I didn't know he had a piece with a horse in the current show and I now would have to ask this person to hang on while I run up and down the gallery, two floors!, searching for some of his other work. See what I mean? On that day I would be a terrible salesperson.

Normally, a gallery has people who work there and know what they have on the walls and who painted it. They also know how to get more of that artists work should someone call to ask for more.....this generates sales as well as making the gallery appear to have at least competent employees who like to sell art as a career.


I'm all for increasing membership dues and entry fees and just breaking down and hiring someone to do this in exchange for more time to create art and having a gallery run like a business by business oriented people. I'm not business oriented....I'm the guy with the goofy visions in my head when looking at something the next guy looks at but who manages to escape the vision part of it....you know, the typical artist who sees more than just what's in front of them. We see color, drama, texture, gorgeous lighting effects, atmosphere where most people see the sun going down which means they'd better step on the gas to get home before their dinner gets cold. I think in terms of imagery where a business oriented person thinks in terms of a good day at work from making $1200.00 in sales generated by their efforts. Their head is filled with thoughts of Bottom Line, Profit Margin and Gross and Net Incomes....that's the person an artist needs around them to succeed....or at least pay the bills.

I don't think most artist-run Guilds or Association galleries will ever make really good profits unless they go with a more business-like run situation. Artists are not going to become salespersons if their lives depended on it. The artist is going to make the attempt to sell art and will sell art but not like a salesperson can sell art. I hate to toot my own horn and I think most artist hate doing that. I'm not overly extroverted either. I can't imagine flapping my arms about whipping out complimentary comments about how much vision I have and how I have created work that will one day be worth far more than the buyer is about to pay for it.


I think Guilds and Associations are content with offering the community a place to show the work of their local artists and if they make a few bucks for operating costs and to donate to the local school art program then fine. The local artist finds a place to show their work, get some well deserved kudos and once in a while make some money to buy more art supplies. I suppose this is why artists who want to seriously make money from their work eventually submit work to privately owned galleries in the attempt to become gallery represented. Naturally, private galleries have higher standards so most artists will eventually move on to shove the balance of their best work in these galleries.

Still, I think there has to be a way to increase sales from the galleries of Guild and Associations. So I'll try to be a better salesperson and also do better work to enter....the latter is the part I do best.

Part of the Morro Bay Gallery

Saturday, April 28, 2007

SUBSCRIBE ME!

My friend and fellow Artist, Diane Cutter , mentioned to me that I should have a Subscription service here on my blog so she can be notified when I post something new...so it is here.
To add your name to the list of subscribers just type in your email address in the box above by the links...that's all there is to it...you can easily opt to remove your name from the subscription at anytime.

Jurors Award


Carpenteria Foothills

12"x16"

Oil on Ray Mar Panel

I'm a member of the Artists Guild of the Santa Ynez Valley and we show our work in juried and non-juried shows in the town of Los Olivos at the Gallery Los Olivos. Recently we had a juried show and one of my pieces won the Jurors Award. In the same show I also won 2nd Place for one of my other paintings. I was flabbergasted...(can't believe we still use that word to this day but it fits!). I always wanted to win an award for my pen & ink works but that never happened. I think my pen & ink work was too realistic for an award considering the work that usually wins awards. Sad but true, realism usually takes a back seat to most work that wins awards in my humble opinion. At heart, I'm a pen & ink artist and painting is what I've done to add color in my portfolio....but it is the painting that has garnered the awards and sales on original work you just have to live with that.


I have sold tons of pen & ink prints but the only awards for pen & ink work has come from the Santa Barbara Country Fair and the California State Fair....which was ok but it would have been nice to get an award in a full blown art gallery environment. Pen & ink is very much an overlooked medium which is ironic because it has been around for so long. It is also a medium that takes a lot of skill to pull off well. Pen & ink artists are a special breed of artists who spend hours perfecting their craft and turn out work that is very very special.


Here is the second Place painting.....

Morning Pasture

9"x12"

Oil on Ray Mar Panel

Anyway....just tooting my horn here. I try and keep that to a minimum but I actually have to do it since I'm not paying an Artrep to do it for me. Nothing worse than having to look people in the eye and say "my work is good, I think you should buy it"....

The Studio....

A long time ago, the High School years, my Dad suggested I take wood shop class. A great class to take for anyone who likes to build things or learn how things are built out of wood. I know, because I have used the knowledge learned back in wood shop a zillion times. It amazes me how many guys don't know a thing about woodwork....but that's another story. One of my projects was to build myself a small wooden drawing board which I did and used at home for years. Just a flat piece of wood with two "legs" that slanted to allow the drawing board to be angled on a dining room table or desk while you drew, it worked great.

After getting out of the Army and getting married and years later that drawing board was nowhere to be found. My drawing board once again became the kitchen or dining room table or any other flat surface that could be found...I took painting class in college and bought a really cheap easel to work on in the garage....this was due to orderless turpentine not being around then and you didn't want the kids getting a contact high inside the house. One thing about the struggles of an artist to find a place to work is it really makes you appreciate a good place once you get it!

So, we enter the current drawing painting setup due to Artist Luck#1....Early one morning I jump on the computer and go to Yahoo Auctions (my local) which practically doesn't exist anymore. Having some money finally in my bank account, I type in "Drafting Table"....and low and behold I find a guy selling one a few miles away for $60.00. A killer table with all the bells and whistles, used, heavier than the Titanic and now sitting 10 feet away from me as I type!

Now Artist Luck #2....I was driving a truck delivering to a company and noticed some flat drafting files, ...2 of them that stack together and usually cost about $400-600 a piece, sitting in their parking lot. Turns out one of the guys there was using them to store small tools in and I asked if he wanted to sell them....he says "$30 bucks" and I couldn't pull the money out of my pocket fast enough! We loaded them onto the back of my truck with a forklift and they are now with me storing my art ambitions.

I now live in a home with a garage that was converted by the previous owner as a studio to do photography. His old dark room is now my storage closet for art supplies. I've aquired a nice solid oak easel for painting and life is good. When I say it is a long way from a wooden table top drawing board I know what I am talking about...took me over 30 years to get here. Now, if I had taken classes in business management or computer programming back in college I would have gotten a great money making job and had this stuff years ago...but artists like to suffer right?
Here is where the painting happens.....


Looks like I did the dramatic lighting thing for a brochure but in reality I was actually working on that lower painting and decided to just snap a shot of the setup...remember, this is a converted garage and most garages don't have big artist needing windows facing south.

I can't see spending megabucks for a wooden taboret so eventually I'll just make one...in the meantime I bought this wire rack on wheels with bins at Costco, Target or WalMart...can't remember but it was pretty cheap. I've seen awesome oak ones in an art supply store down in Santa Barbara but price-wise it's like buying a house! I'm sure you can go through an Escrow company to help you out with the purchase of it....not me, I'll make one.Get one with wheels! I am always moving this thing around and glad I'm not picking it up all of the time....and besides, you can roll the coffee closer to you as you paint and it gets later at night!

For additional art supply storage it is hard to beat getting plastic stacking bins. You could even put one of these in a closet to keep "out of sight out of mind" from the ever forgetful teenager or wife/husband that is always looking for something to write with...like your art supplies!

An artists needs a place to work and places to store the equipment needed to create art. Unless you are the son or daughter of Donald Trump or Bill Gates you might have to wait a while to get that but if you keep your eyes on the prowl for the great finds out there you can do it. I did it, so can you....just remember to appreciate it!