One of the places I show my work is at the Morro Bay Art Association Gallery in Morro Bay, about an hour and a half north of where I live. As part of the deal there you must work a 4 hour shift each month while the show is on that your work is entered. 4 hours is not a lot of time if you live in or near Morro Bay but for me it becomes and all day thing doing it. 3 hours drive time plus getting ready to go up there. I make the best of it by using the drive to collect reference photos for future work.
The good part of artists working the gallery is it keeps costs down to run the Guild or Association gallery....the bad part is that not every artist is a good salesperson...which is the goal of the gallery, selling the art created by the artists members. I would say at least half of the artists I know are pretty shy, introverted people....not the type who commonly get jobs as salespeople. Another downfall to having the artists do the selling is that most of us don't know each other, we don't know what type of work we all do nor anything about the specific works in any one show.
I've had someone call me at the gallery and say "I'm calling about John Doe's painting of the horse and wondering if he has any other works there?"....Naturally, with about 50 members I don't know a John Doe, I didn't know he had a piece with a horse in the current show and I now would have to ask this person to hang on while I run up and down the gallery, two floors!, searching for some of his other work. See what I mean? On that day I would be a terrible salesperson.
Normally, a gallery has people who work there and know what they have on the walls and who painted it. They also know how to get more of that artists work should someone call to ask for more.....this generates sales as well as making the gallery appear to have at least competent employees who like to sell art as a career.
I'm all for increasing membership dues and entry fees and just breaking down and hiring someone to do this in exchange for more time to create art and having a gallery run like a business by business oriented people. I'm not business oriented....I'm the guy with the goofy visions in my head when looking at something the next guy looks at but who manages to escape the vision part of it....you know, the typical artist who sees more than just what's in front of them. We see color, drama, texture, gorgeous lighting effects, atmosphere where most people see the sun going down which means they'd better step on the gas to get home before their dinner gets cold. I think in terms of imagery where a business oriented person thinks in terms of a good day at work from making $1200.00 in sales generated by their efforts. Their head is filled with thoughts of Bottom Line, Profit Margin and Gross and Net Incomes....that's the person an artist needs around them to succeed....or at least pay the bills.
I don't think most artist-run Guilds or Association galleries will ever make really good profits unless they go with a more business-like run situation. Artists are not going to become salespersons if their lives depended on it. The artist is going to make the attempt to sell art and will sell art but not like a salesperson can sell art. I hate to toot my own horn and I think most artist hate doing that. I'm not overly extroverted either. I can't imagine flapping my arms about whipping out complimentary comments about how much vision I have and how I have created work that will one day be worth far more than the buyer is about to pay for it.
I think Guilds and Associations are content with offering the community a place to show the work of their local artists and if they make a few bucks for operating costs and to donate to the local school art program then fine. The local artist finds a place to show their work, get some well deserved kudos and once in a while make some money to buy more art supplies. I suppose this is why artists who want to seriously make money from their work eventually submit work to privately owned galleries in the attempt to become gallery represented. Naturally, private galleries have higher standards so most artists will eventually move on to shove the balance of their best work in these galleries.
Still, I think there has to be a way to increase sales from the galleries of Guild and Associations. So I'll try to be a better salesperson and also do better work to enter....the latter is the part I do best.

Part of the Morro Bay Gallery


 Here is a shot of Linda in front of the painting from Hawaii. A great harbor scene.


 Here is a shot of the texture of the canvas after final gesso has been applied. Very much like the Ray Mar panel surface so I'm happy.
 The Masonite I purchased was Tempered Masonite as opposed to Un-Tempered Masonite. If you can find untempered masonite buy it and use that. Tempered masonite is impregnated with oils so it stands up to outdoor usage. People worry about the oil coating getting to the paint. The bulk of the oil is really on the surface so sanding takes off most of the oil coating. I am covering it with the glue and the canvas and the final coats of gesso so the oil in the board is not going to effect the painting at all, but, get untempered masonite in case you decide to paint on the masonite without covering your panel with canvas. I plan on covering all of my boards with canvas so tempered masonite was ok for my purpose.


 Jean's setup....this girl was out to make money!
 Syd's setup...customers already lined up blocking my shot. Another artist ready for raking in the cash!
 I waited to get a clear shot of the backyard littered with ART....what great setups and killer work all around....Lots O' Art.
 Jean's yard is so tropical looking and she has great grass. I live on a hillside and have Native grass which means once summer rolls around we have brown grass!
 Check out Syd's easel on the right hand side...her hubby made these out of garden lattice bought at Home Depot, super light to carry and worked great. Note the excellent setup of smaller items under $100...an artist on the ball! How proudly she stands! I was working with art sale veterans that day!
 Here is what my view of Jean's area looked like most of the day...customers customers customers. She did really well and it goes to show that planning pays off. Jean is totally a veteran of selling art and knows what the heck she is doing....how do I know this?, because I had to help her pack some of her sold paintings! I'm doing another show thatJean is in charge of later this month so I'm going to gear up with things I've learned here and hope for a better day.


 And the fnished piece. I probably spent about less than an hour actually painting it but it was spread out talking and eating lunch. A little 6"x8" Oil on Ray Mar panel.


 Here is a closer detail of this
  Step 2...We now mix up white with just a dab of Alizarin and a dab of UBlue for a light pinkish blue mixture for the lighter shades of the clouds. Before blocking in this mixture I add pure white to areas of the clouds where I want the brightest highlights. Then I paint in my pink mixture, again you don't have to accurate here, just block it in the general areas.
 Step 3...Before we convert that mixture to the darks for the clouds we grab some to keep seperate for blending later. Here you see my sky blue mixture, the light pinkish mix and the blob I am saving at the top of the palette.
 Now I darken my original mixture with more Alizarin and UBlue (SAVING MY BLOB for later)
 We now paint in the darks of the clouds and get happy because we are almost to the blending stage....
 Some areas are lightly painted in to create the shapes of the upper cloud areas...gives it that billowy-puffy look called "Shape" in art lingo.
 A detail of the blended version....
 Step 5... I basically finish the painting, the ground area to let the sky have tme to set up a bit. The last thing I do is go back into the sky area and add some darker wisps of clouds over the rest to give the clouds a more 3 dimensional look to it. Just dab some random dark paint and then blend lightly.
 Here is my finished painting with the ground area completed.....
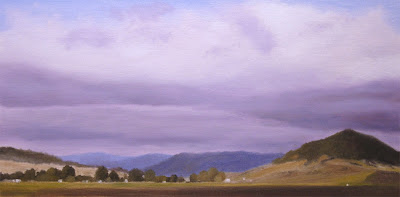 That's basically it....stay loose, play with blending until you like your results...if it goes bad just add more paint the the areas you blended too much and blend again. If you don't have a fan brush go get one...wipe it off as you blend in different ares that are critical of color...you don't want to start blending a white highlighted area with a fan brush still loaded with your darks on the brush.
