Wednesday, April 30, 2008

Paint a Tree...Made Easy

Eucalyptus Trees, very large and very cool to paint. Well, in California they are painted all the time. I'm going to show you how to paint one...why? Because if you can paint one of these you can pretty much do most trees in your paintings. The principle is the same. Basically, a tree is a large mass of darks...mid-values...highlights...branches & skyholes and in that order. Trees are not big green pom poms with a brown trunk popping out of the bottom. That's what you paint in the 5th grade. We are going to paint a killer eucalyptus tree that will look great and improve your tree work....thus improving your paintings and skill level.
There are other trees that look quite differently but can be approached in very much the same manner as we are going to approach this Euc. So, here we go........


This is a painting I've just finished but took the time to photograph my tree work to help others that are interested. I've finished my sky work first...I left the area where the tree would be so I don't have to paint over wet paint. If you sketch your tree don't worry about a little sky paint going over the lines...that's ok.
Step 1 Blocking in the Darks...
First I will mix a very dark mix of French Ultramarine Blue/Alizarin Crimson and a dab of Cadmium Yellow Pale. This is my dark mix but you can use whatever you'd like to get a dark mix of green or reddish green or even blue. I go for reddish green. I add Copal Painting Medium made by Grumbacher to all of my mixes. I usually add 5 or 6 drops off of my palette knife or just pour the drops onto the paint mix. You can add as much as you want but remember, the more you add the more watery & transparent it becomes...like a wash. This medium aids in drying time of oil paint and leaves a nice shine to your paint instead of the usual flat look of dired oil paint.
I can either block in the entire tree or just the areas where the dark show through the mids. I've done both so experiment and see which method you like. Here, I've darkend in the entire tree area.

Now, on this tree I am going to have the upper half of the tree catching more light and the lower section in shadows. I like the darks here but I want the bottom really dark so I'm going to add a little more of my dark mix down there to darken that part more. That gets me to this point...

That look pretty good so lets get started adding the mids....

Step 2 Adding the Mid Values...

...or Middle values which are a lower value green mix. In other words trees are like dark green, green and yellow but we adjust all that depending on the tree. Since there are all of these color variations with trees I just call them darks, mids and highlights. My mid green is going to be the same color combination as the darks mix but with less Alizarin and more Cad Yellow Pale. Here is what it looks like as we begin...

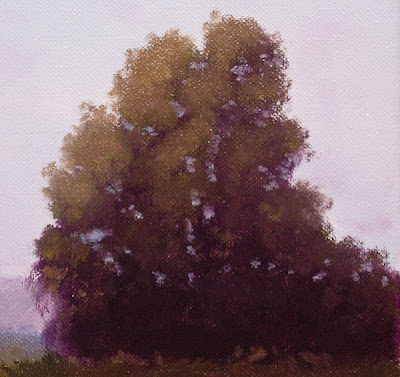
I began by painting thicker mids at the top of the tree and thinner towards the bottom with a light touch of the brush. Most of the mids will be covered by highlights but you can choose to leave as much of your mids showing as you like. The mids here will show as a slight ring around my highlights.

Step 3..Adding Highlights...

Here you can see how I have blended the highlight mix to the sunlit area. This mix is the same as before but with more Cad Yellow Pale. I faded my highlights from top to bottom and left to right. My light sorce is from the left so I'm leaving the darker colors to suggest shade on the right side of the tree. Step 4 Skyholes and Trunks...

After the foliage is done we need to add some light peeking through the trees and to hep us shape our tree better. I use just a slightly darker shade of my sky mix to add skyholes. For turnks and branches I've just added light strokes with white and a bit of my dark mix added.

and now the trunks and branches...


The only thing I do after this step is to go around and tweak the tree up...a dab of color altered here and there, some edge work etc...just little things to make it look good.

I think that's a pretty convincing Eucalyptus tree...not the pom pom type of Euc, more the bush looking one that my neighbor has. I have both on my property. So, these are not as hard as you might have thought. Remember, darks, mids, highlights, skyholes and trunks...that's it. Below is how the tree looks in the competed painting....Hope you got something out of this and give it a try.

"Prelude To Evening"

9"x12"

Wednesday, April 16, 2008

A Nocturne

I don't know why but I really have this thing for nocturnes...I love them. I tried doing one once but it was horrible. Night colors are so different to day colors and I just didn't get it. I loved seeing the works of Whistler and Grandville Redmond and lots of others. They have such an eerie feeling to them, and although I'm not an eerie kind of guy, I'm attracted to them all the same. At the house of a painter friend I saw some nocturnes he had done...really nice ones. Like most of the other nocturnes I had seen before I studied how he handled the scene. Always taking mental notes which is what I do constantly when looking at other artists work.

So....last night before going to bed I decided I might as well try one since I had 2 8"x10"'s gessoed up and ready to go. An 8x10 is not a huge canvas to lose if the painting goes sour...besides, I'm good enough now to recognize a bad piece as it progresses and can wipe that baby down in a heartbeat while the paint is still wet. Frugal...that's what my middle name should have been.

This scene I painted does not exists anywhere except in my head. I wanted sky, a distant mountain range, a big tree and some smaller ones behind it to create depth. There is a tree close to where I live on a slanted hilside that I took pics of the other day...again, and I just tried to visualize it when doing this one. I'm still not the expert at painting nocturnes but I figured the use of blues and greys would mute my colors enough to read as night colors. My tree here probably has too much color in it and in the future I'll try going darker there. The way different artists handle nocturnes is kind of strange...some paint them really dark which makes sense to me...it is night time, but others paint them really bright. Whistler handled them both ways so I'll try the same...the guy was pretty damned good at painting so I have no problem following his lead in variety rules.

I'd like to explain my color mixes better but honestly so much of it was done on the fly I really would have a hard time doing it. I used my usual dark mix for the tree and then added slightly more yellow and grey to make the tree highlights....well, mids because there is no highlights on the tree. The grasses were just using this mid color and maybe adding some barely brighter grey or greens to them in places. Seat of the pants type or work there. The trail started out as just a splash of yellow ochre dulled with dark grey as just a small foreground highlight but my mix was too bright and I used too large of a brush. The first thing that came to mind was it looked like a flat patch of dirt in the dark to me and then I thought "trail"....a dew additional strokes and trail is was. Hey, it's my imagination so I can do what I want there.

Anyway...here is my finished piece which now sits drying on a shelf and I'm pretty happy with it...turned out much better than I thought and most of it done Alla Prima last night. I did however mess with the foreground grasses some more this monring so I can't really call it an alla prima totally...but mostly.

"The Foot Trail"


8"x10" Oil on canvas

and some details....

Monday, April 07, 2008

Painting Portugese Bend


OK.....actually painting the wild mustard at Portugese Bend...which is an area of the Palos Verdes peninsula which is the boot looking piece of land just south of Los Angeles along the coast. It's a beautiful area that I have driven through many times. I was recently invited by friend and fellow painter Bruce, (boomerbeach), from WC to go do some plein air painting and catch the wild mustard in full bloom before it's gone. The mustard here grows to 6 feet tall and some of the areas we walked you were hidden in the mustard. We had a great time.

By the time I had gotten there a lot of painters, including Bruce and Bill Wray, were already out painting. We had about 10 painters show up. I ran into Bill when finishing my painting as he stalked out killer reference shots with his camera. I saw Bruce later at dinner. This was not an offical plein air painting deal, just a group of people getting together to paint and have dinner later. Here are some pics from the day.


The view to the top of the peninsula Mustard abounds....


Me, working it up on the 9"x12" panel. This was a great spot. The field in from of me used to be a bean field way back in the 40's.


Walk to the edge of the bean field and this would be your view down onto the Pacific Ocean. Is this place awesome or what!

That's me, all finished up with my painting. I have done 2 other paintings in the studio with mustard fields and used a brush to do the mustard. On this one I decided to see what using a knife would look like. That decision was brought on by me rubbing on a tinted ground that didn't quite dry and I was worried painting in the mustard would blend too much with the undercoated paint. I think I prefer the brush method though....next time, no tinted ground.

This is where I chose to paint...right off the road next to the beanfield. Took lots of reference shots so I'll be doing more paintings from this area. The cliffs down along the beach are totally awesome and I plan on returning to do some PA work there once I get painting cliffs down to a science...hahaha.


the finished painting.....needs a brush for that mustard!
and a detail shot.....

Tuesday, April 01, 2008

Adding Color...Flowers

It is almost Springtime here in Solvang...located in the Santa Ynez Valley. This year it hit me...COLOR! I do a lot of driving and have really noticed the color to the landscape that native plants bring. California Poppies, Wild Mustard...I'll do Blue Lupine soon too. Here are some new paintings that I sprinkled flowers in which brings some added color to my usually subtle work. Poppies with a yellowish tint

Wild Mustard in a field near San Luis Obispo


Nice orange California Poppies in Santa Ynez

An Evening Scene

Well, I painted this scene before using a square format, 24"x24". Worked real well and sold in the first show I had it in December in Gallery Los Olivos. It now resides in Kentucky somehwere. I liked the original but felt the colors I used in that one were too light so I decided to paint it again in a much smaller size, 9"x12", and go darker. I recently painted some other smaller 8"x10"'s and they were darker and looked really cool in these new black plein air frames I've been buying. I recently bought a boatload of Windsor&Newton canvases from Jerry's while they were on sale so I whipped this one out today...Alla Prima, in about 3 hours.

I'm loving Alla Prima work and discovered the best way to do one is to not plan to do one! Sneaking up on Alla Prima work is my best way of doing one because when I say I'm going to do one for sure something goes wrong and I work 2 days doing it. Alla Prima - is completing a painting in one sitting. Why do Alla Prima? Because it teaches you what you need to know to paint fast so when you go outdoors to do Plein Air you are only dealing with capturing the local color and light...knowing how to mix fast and get the colors you want is learned doing Alla Prima inside the studio. Knowing how to control your painting techniques is also learned inside....otherwise you are just asking for hours spent swatting flies, wasting paint and coming home with less than a finished painting.

"Evening"

9"x12" Oil on Canvas