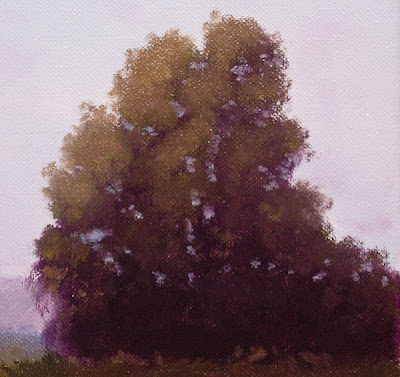
 Now, on this tree I am going to have the upper half of the tree catching more light and the lower section in shadows. I like the darks here but I want the bottom really dark so I'm going to add a little more of my dark mix down there to darken that part more. That gets me to this point...
 That look pretty good so lets get started adding the mids....
Step 2 Adding the Mid Values...
...or Middle values which are a lower value green mix. In other words trees are like dark green, green and yellow but we adjust all that depending on the tree. Since there are all of these color variations with trees I just call them darks, mids and highlights. My mid green is going to be the same color combination as the darks mix but with less Alizarin and more Cad Yellow Pale. Here is what it looks like as we begin...
 I began by painting thicker mids at the top of the tree and thinner towards the bottom with a light touch of the brush. Most of the mids will be covered by highlights but you can choose to leave as much of your mids showing as you like. The mids here will show as a slight ring around my highlights.
Step 3..Adding Highlights...
Here you can see how I have blended the highlight mix to the sunlit area. This mix is the same as before but with more Cad Yellow Pale. I faded my highlights from top to bottom and left to right. My light sorce is from the left so I'm leaving the darker colors to suggest shade on the right side of the tree.  Step 4 Skyholes and Trunks...
After the foliage is done we need to add some light peeking through the trees and to hep us shape our tree better. I use just a slightly darker shade of my sky mix to add skyholes. For turnks and branches I've just added light strokes with white and a bit of my dark mix added.
 and now the trunks and branches...
The only thing I do after this step is to go around and tweak the tree up...a dab of color altered here and there, some edge work etc...just little things to make it look good.
I think that's a pretty convincing Eucalyptus tree...not the pom pom type of Euc, more the bush looking one that my neighbor has. I have both on my property. So, these are not as hard as you might have thought. Remember, darks, mids, highlights, skyholes and trunks...that's it. Below is how the tree looks in the competed painting....Hope you got something out of this and give it a try.
 "Prelude To Evening"
9"x12"
Hi Ron,
ReplyDeleteThank you, thank you, thank you!!! I was just searching on the best way to paint trees especially eucalyptus. You must have esp. Thanks for being so generous with your knowledge. A beautiful tree & beautiful painting. You make me want to go out & paint!
Maggie
Hi again ...
ReplyDeleteForgot to ask about your addition of Copal Painting Medium. I am new to oils (used acrylics many years ago) so am unaware of this product. Do you (& other Plein Air artist) use this product in all of your paintings? What is the dry time? I think I'll go to our local art store & pick some up and experiment). It is so great to be able to have other artists answer such questions instead of stores where they're just interested in selling a product!
Maggie
Hi Maggie,
ReplyDeleteThanks for the good words...glad if it helps out with your work. Inspiration is invaluable! Using Copal is fairly common with a lot of PA painters. You can also use Liquin. Copal will get your paints to tack up way faster than not using it. Depending on how thick you apply your paint and how much copal will vary your drying times. I paint my darks pretty thin so they will get tacky by the end of a day and sometimes dry to touch by the next morning.
If you put it on thin and you have a breeze or full sun you can paint over it using a light touch in an hour or two. You really have to get the feel of it and experiment with how much copal to add.
Another way to paint your darks is to mix them with just turpentine and leave the copal for the next layers....that works great when doing PA.
Ron
A great tree tutorial. Always keen to learn how others work, so thanks very much for sharing. :)
ReplyDelete