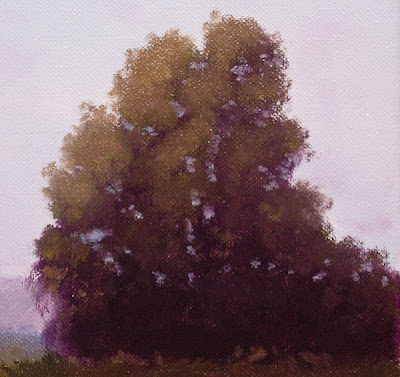
Eucalyptus Trees, very large and very cool to paint. Well, in California they are painted all the time. I'm going to show you how to paint one...why? Because if you can paint one of these you can pretty much do most trees in your paintings. The principle is the same. Basically, a tree is a large mass of darks...mid-values...highlights...branches & skyholes and in that order. Trees are not big green pom poms with a brown trunk popping out of the bottom. That's what you paint in the 5th grade. We are going to paint a killer eucalyptus tree that will look great and improve your tree work....thus improving your paintings and skill level.
There are other trees that look quite differently but can be approached in very much the same manner as we are going to approach this Euc. So, here we go........
This is a painting I've just finished but took the time to photograph my tree work to help others that are interested. I've finished my sky work first...I left the area where the tree would be so I don't have to paint over wet paint. If you sketch your tree don't worry about a little sky paint going over the lines...that's ok.
Step 1 Blocking in the Darks...
First I will mix a very dark mix of French Ultramarine Blue/Alizarin Crimson and a dab of Cadmium Yellow Pale. This is my dark mix but you can use whatever you'd like to get a dark mix of green or reddish green or even blue. I go for reddish green. I add Copal Painting Medium made by Grumbacher to all of my mixes. I usually add 5 or 6 drops off of my palette knife or just pour the drops onto the paint mix. You can add as much as you want but remember, the more you add the more watery & transparent it becomes...like a wash. This medium aids in drying time of oil paint and leaves a nice shine to your paint instead of the usual flat look of dired oil paint.
I can either block in the entire tree or just the areas where the dark show through the mids. I've done both so experiment and see which method you like. Here, I've darkend in the entire tree area.
 Now, on this tree I am going to have the upper half of the tree catching more light and the lower section in shadows. I like the darks here but I want the bottom really dark so I'm going to add a little more of my dark mix down there to darken that part more. That gets me to this point...
 That look pretty good so lets get started adding the mids....
Step 2 Adding the Mid Values...
...or Middle values which are a lower value green mix. In other words trees are like dark green, green and yellow but we adjust all that depending on the tree. Since there are all of these color variations with trees I just call them darks, mids and highlights. My mid green is going to be the same color combination as the darks mix but with less Alizarin and more Cad Yellow Pale. Here is what it looks like as we begin...
 I began by painting thicker mids at the top of the tree and thinner towards the bottom with a light touch of the brush. Most of the mids will be covered by highlights but you can choose to leave as much of your mids showing as you like. The mids here will show as a slight ring around my highlights.
Step 3..Adding Highlights...
Here you can see how I have blended the highlight mix to the sunlit area. This mix is the same as before but with more Cad Yellow Pale. I faded my highlights from top to bottom and left to right. My light sorce is from the left so I'm leaving the darker colors to suggest shade on the right side of the tree.  Step 4 Skyholes and Trunks...
After the foliage is done we need to add some light peeking through the trees and to hep us shape our tree better. I use just a slightly darker shade of my sky mix to add skyholes. For turnks and branches I've just added light strokes with white and a bit of my dark mix added.
and now the trunks and branches...

The only thing I do after this step is to go around and tweak the tree up...a dab of color altered here and there, some edge work etc...just little things to make it look good.
I think that's a pretty convincing Eucalyptus tree...not the pom pom type of Euc, more the bush looking one that my neighbor has. I have both on my property. So, these are not as hard as you might have thought. Remember, darks, mids, highlights, skyholes and trunks...that's it. Below is how the tree looks in the competed painting....Hope you got something out of this and give it a try.
 "Prelude To Evening"
9"x12"
 Here you can see a side view sitting on the easel. The painting is just sitting inside the frame waiting to be mounted correctly with screws. After that I'll wire it up and see how it looks hanging. I'm going to take this to the vineyard show at Tres Hermanas this friday and see what the wine crowd thinks of it.


 I then applied the glue pretty evenly with one of those throwaway brushes that was wet to ease spreading the glue out.
  Then you just lay your canvas on top of that and smooth it out with your hand....I also rolled a brayer over it to roll it as flat as possible. Not necessary if you don't have one but if you do it helps. If you buy one get a wide one. Mine is pretty small but did the job.
 Then you let it dry. I do a bunch at one time, stack them and put a scrap piece on top with whatever weights I can find...you can use books too. The Elmers dries in an 1-2 hours but you can leave it overnight for extra measure. Then you just trim it. Lay the panel canvas side down and use the edge of the panel as a guide while you cut off the excess canvas with a utility knife.
 These have a great tight bond and look very similar to a very famous brand of panels that cost much, much more.
 Cool edges huh? If I had tons of money I'd just buy them but since I don't making them is a very practical alternative....and it is very easy!
 I then cut the length into 4 pieces. Then cut the width for the sides and back and then cut miter cuts where the 2 pieces will join at 90 degree angles. The miter cut is a 45 degree cut.
 The next step is to assemble the four sides of the frame with wood glue and either small finishing nails or brads. I used brads shot with an airgun (fast!) but a hammer and finishing nails would work fine. If you used an epoxy glue you could probably skip nailing altogether. I was working alone so having this little clamp to hold the corners is great! I should have bought two though.
 This is a crummy picture of the next step...nailing the back to the sides but you can see how the miter cut works. It gives you a nice joined edge
 That is the basic assembly. Let it dry overnight and then sand all the sides and edges. I sand a smooth radius around the front edges and corners too. After that you wipe it down to get the sawdust off of it and then start rubbing in the wax. I used a wax with an orange oil in it to protect the wood. I love this step because now the oak really shows it's beauty.
 Here is the whole frame waxed up....nice! From this point you just drill holes in the back of the frame and then place your painting in there...get the sides even and then screw into the back of your strecther bars to hold it all together.
  Here is the frame and painting mounted together.
 Here you can see the gap between frame and canvas. Also, the corners and edges. Notice the side nails are placed at bottom and top of frame so you can't see them. The back is nailed from behind so you can't see those nails either.
 It looks like a ton of work but this second frame was much easier to build than the first...all of the figuring out was spent on that first one. I've seen versions of framing paintings where they built the frame flush with the edges of the painting and made no back at all. I've seen one like that made that was simply built of pine and then sprayed with black paint and it looked pretty cool too. Just a matter of what results you are looking for.


 Here is the reference photo I worked from....


 Here are some of the items to be left out of the scene which include the house on the hill, phone poles, fencing, the street, car and palm trees which were not native to California back then....
 Basically, I left out all man made objects and inserted the trail to represent the future road...I figure if the road is there now then back then it was a route of travel and must have started as a trail...maybe it did maybe it didn't but since this isn't science class I'm going to go with "it did". Part of this painting is imagination, my view of how I percieve the past at this location. That grass on the right handside going into this small canyon was not there back in the 1800's. Pasadena and much of the rest of southern California was arid. Water for lawns and gardens and drinking water to support the millions of people who live there now came from up north via the California Aquaduct. The valleys below the mountains were strewn with boulders washed down from the canyons from heavy rains. I imagine the landscape in the valleys was laden with runoff ditches from the flood waters of rain and snow melt from heavy winter snows up in the San Gabriels. Pepper trees and palms were brought in by the spanish missionaries. If you look at the works by the early California Impressionsists starting around the turn of the century you can see painted records of what the land looked like around the San Gabriel and San Fernando Valleys...nothing like it looks today.
 Here are some details...why? because they look cool and you can see my mistakes up close! hahahaha.


