
 Here is a closer detail of this
  Step 2...We now mix up white with just a dab of Alizarin and a dab of UBlue for a light pinkish blue mixture for the lighter shades of the clouds. Before blocking in this mixture I add pure white to areas of the clouds where I want the brightest highlights. Then I paint in my pink mixture, again you don't have to accurate here, just block it in the general areas.
 Step 3...Before we convert that mixture to the darks for the clouds we grab some to keep seperate for blending later. Here you see my sky blue mixture, the light pinkish mix and the blob I am saving at the top of the palette.
 Now I darken my original mixture with more Alizarin and UBlue (SAVING MY BLOB for later)
 We now paint in the darks of the clouds and get happy because we are almost to the blending stage....
 Some areas are lightly painted in to create the shapes of the upper cloud areas...gives it that billowy-puffy look called "Shape" in art lingo.
Step 4...Now we get out a fan brush and begin blending. Just sweep your fan in an X pattern brushing once across the canvas and then the opposite direction across the canvas...do this till the edges blend. If some of the edges don't blend easily dab in some of the Saved Mixture of lighter pink to the edge and fan again in that spot....that's why you save some of this mixture. Fan until it looks COOL! You will have to be the judge of what looks cool to you but you'll find it. I have faith in you. Here is my version of cool.... A detail of the blended version....
 Step 5... I basically finish the painting, the ground area to let the sky have tme to set up a bit. The last thing I do is go back into the sky area and add some darker wisps of clouds over the rest to give the clouds a more 3 dimensional look to it. Just dab some random dark paint and then blend lightly.
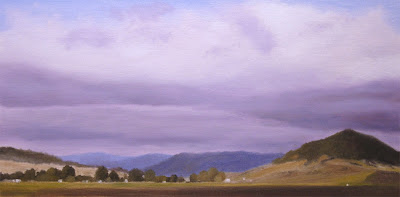
 Here is my finished painting with the ground area completed.....
 That's basically it....stay loose, play with blending until you like your results...if it goes bad just add more paint the the areas you blended too much and blend again. If you don't have a fan brush go get one...wipe it off as you blend in different ares that are critical of color...you don't want to start blending a white highlighted area with a fan brush still loaded with your darks on the brush.
Good luck with your clouds and have fun making them!
8 comments:
Thanks for this great demo Ron! The result is very harmonious, the sky works fantastic with the landscape. Oh! I love this combination of dark clouds and the shadows on top of the mountains!
And thanks a lot for your compliment btw.
I was caught in a tagging storm ragging the internet at the moment. I tagged your blog as a result of it. My post explains the system. Feel free to join or ignore of course!
Hi Bart,
Glad you like the demo on clouds here. It was fun to do and shows enough, I think, to make doing them a little easier for those who want to try.
I'm not sure what a tagging storm is (but it sounds bad) so I'll check out your post...thanks Bart!
Wonderful WIP - thank you! Very helpful. And the finished piece is very nice; love the lighting.
You've got some good looking stuff going on here ol' chap. It has been fun to watch your growth. Keep smearing the grease. I will go ahead and put your blog up as a link and hopefully you will consider the same.
Hi Ron
THanks for the demo- always interesting to see other artists ways! YOu really are becoming a master of skies and clouds, a subject that your soft edged styles is made for.
Cheers
Ryan
Been loving these long ones--- More!
Leslie - Thanks for the comments Leslie. Glad you liked the demo here.
Les - Your link is up and running Les. Thanks for adding mine to your Blog. Very nice comments too Less, thanks!
Ryan - I think I'm not a Master yet Ryan but I am getting good at doing the clouds....like anything, it's just a matter of doing them over and over. Pretty soon people will be getting sick of seeing these clouds in my paintings! hahahaha. Thanks Ryan.
Bill - Glad you like these Bill, coming from you that's quite the compliment. I've bought some larger wide canvases and working on one of those now. Thanks!
Ron
Post a Comment