Friday, June 27, 2008

Build an Oak Floater Frame

This is a floater frame for a gallery wrapped canvas. It is called a "Floater" because the frame is built larger than the canvas and then the canvas is mounted inside the frame and attached by screws to the back of the frame. This leaves a gap between the frame edges and canvas and appears to make the canvas float inside of the frame. Very cool looking!
You can buy these ready made or have them made per your dimensions if you look around online or talk to your local framer. Since my framing budget is nowhere near that of many painters whose names you know I made this one myself...it is my second floater frame I've made and came out pretty good I think.

It is made of Red Oak strips bought at Home Depot, 1"x4". I then saw it down to the size I need on a table saw. The corners are miter-cut on the table saw and then glued and nailed together...it's sanded and then rubbed with wax to protect the wood and enhance the wood grain of the oak.

Here is the procedure for those of you do-it-yourself types.


Here is the Red Oak purchased at Home Depot before cutting down to lengths to work with. Cost is about $2.50 per foot.

I then cut the length into 4 pieces. Then cut the width for the sides and back and then cut miter cuts where the 2 pieces will join at 90 degree angles. The miter cut is a 45 degree cut.


The next step is to assemble the four sides of the frame with wood glue and either small finishing nails or brads. I used brads shot with an airgun (fast!) but a hammer and finishing nails would work fine. If you used an epoxy glue you could probably skip nailing altogether. I was working alone so having this little clamp to hold the corners is great! I should have bought two though.


This is a crummy picture of the next step...nailing the back to the sides but you can see how the miter cut works. It gives you a nice joined edge


That is the basic assembly. Let it dry overnight and then sand all the sides and edges. I sand a smooth radius around the front edges and corners too. After that you wipe it down to get the sawdust off of it and then start rubbing in the wax. I used a wax with an orange oil in it to protect the wood. I love this step because now the oak really shows it's beauty.


Here is the whole frame waxed up....nice! From this point you just drill holes in the back of the frame and then place your painting in there...get the sides even and then screw into the back of your strecther bars to hold it all together.
Here is the frame and painting mounted together.
Here you can see the gap between frame and canvas. Also, the corners and edges. Notice the side nails are placed at bottom and top of frame so you can't see them. The back is nailed from behind so you can't see those nails either.

It looks like a ton of work but this second frame was much easier to build than the first...all of the figuring out was spent on that first one. I've seen versions of framing paintings where they built the frame flush with the edges of the painting and made no back at all. I've seen one like that made that was simply built of pine and then sprayed with black paint and it looked pretty cool too. Just a matter of what results you are looking for.


If you kept the edges all flat without the miter cuts and could find the wood in the correct thickness you could build this frame with just a miter box made of wood or plastic. It's just hard finding the wood in the right thickness. My wood is 3/8" thick and I started with 1" thick wood. That's why you need a table saw to do this. The table saw is also needed to cut the miter cuts. It's a fun project though....give it a try sometime.


UPDATE.....here is a pic of the back of the frame showing how the canvas mounts to the frame. The canvas lays flat against the back of the frame. Your stretcher bars of the canvas will butt up against the back of the frame. All you need to do is center the canvas in the frame and drill a pilot hole through the back of the frame and into your stretcher bar. Then simply put a screw in to hold your canvas to the back of the frame. I used 4 screws to mount this painting. To center the painting I use either pieces of foam core or bits of old mat board placed between the frame and the edge of the canvas...just add pieces until the painting is even on all 4 sides. ANOTHER UPDATE....Here are some additional pics of the assembly of the frame. Again, the shape of the frame is an "L" for each side of the frame. I did a mitre cut on each piece where they are glued together forming the "L". A mitre cut is a 45 degree bevel cut (actually any degree of bevel). For additonal strength I shot 3/4" brads, which are like finishing nails, in from the back of the frame....see diagram below.

Instead of brads you can use small finishing nails. I bought an air powered brad gun, which is a lot like an electric staple gun, at Harbor Freight for about $20. I already had a compressor to run it. I'm sure they sell manual or electric brad guns too....try Home Depot.


Here you can see from the behind the frame looking down from the top. The brads (circled in white) are shot from the top and from behind the frame. This keeps the viewer from seeing the brads when the frame hangs on the wall. Brads at the bottom of the frame are shot upward...the reverse of these tops ones. You can also see the mounting sheet metal screw going through the back of the frame and into the back of the stretcher bar holding the painting to the frame.

By shooting the brads from the top and back of the frame you end up with a smooth brad-free frame side like it is shown below. By using the bevelled mitre cut to join the sides and back you have a seamless joint.

Friday, June 20, 2008

Show in Ventura, CA


"International Waters Exhibit "

August 2 - October 15, 2008

Maritime Museum - 2731 S. Victoria Ave. Oxnard, CA. 93035

Tel: 805-984-9620


2 of my works have been juried into this show. "Eureka Boatyard" & "Motor Lifeboat". This is the 2nd show featuring the works from members of the
International Society of Marine Painters.

Show Reception - Saturday, August 16, 2008 3-6PM
I'll be at the reception in case you want to stop by and say "hi!"

Coos Bay Oregon Show


I have had my painting "Morning Boats, Rogue River" juried into the 15th Annual Maritime Art Exhibit at the Coos Art Museum in Coos Bay Oregon. Here are the details....

Show Dates

July 19th - September 20th, 2008

Where

Coos Art Museum, 235 Anderson Ave. Coos Bay, Oregon.

(1 1/2 blocks west of Hwy 101 in downtown Coos Bay, Oregon)
Show Reception
Saturday, July 19, 2008
3:30 - 5pm

Santa Ynez Meadow


This painting is another in my attempts to better myself painting-wise with trals, native grasses etc. Not so much to learn on this particular one as just for the fun of it. I composed the scene as I painted it starting with the sky and working down.

This working without a ref is really a nice change and much faster than having a scene to capture. Here you just add whatever you want and make it look good. Pretty fun stuff.

"Santa Ynez Meadow"

9" x 12" Oil on Ray Mar panel

Saturday, June 14, 2008

Backyard Nocturne

I live on a sloping part of a hill called Chalkhill. Don't ever dig here...it is mostly chaky rock and adobe...the creek close to my house is what the Spanish missionaries used to get adobe to build the Santa Ynez Mission. Don't dig here! I took a pic one day of the corner of a field where we planted a large garden last year. I was looking at it and decided to make the scene into a nocturne. First I cropped the part I wanted and then got to painting. Here is the result...

Here is the reference photo I worked from....

Monday, June 09, 2008

More Mojave Desert

"Mojave Wash"

Did this one recently to add to my paintings done of the Mojave desert. It's good to paint something else besides scenes of the Central Coast of California. This is a small wash running through the desert caused by flash floods from the strong rains that come at times. It is a small 9"X12" painting.
A Detailed image of the painting......

Thursday, June 05, 2008

Pasadena Foothills

I grew up in Pasadena and lived about 3 minutes from the base of the San Gabriel Mountains. This past winter I was visiting my parents and decided to go take reference pictures at Eaton Canyon. While driving there I took pics along the way. The street that runs along the base of the mountains to Eaton Canyon is called New York Drive....a big 4 lane divided street. I decided to paint a scene along that stretch of road but leaving out all of modern civilization and paint what I feel it would have looked like before the turn of the century. I did however paint in a trail to represent where the future New York Drive would exist.....I love doing paintings like this and this is my second one with a sort of time travel feel.


Here is the road as it appears today and my reference photo to work from....

Here are some of the items to be left out of the scene which include the house on the hill, phone poles, fencing, the street, car and palm trees which were not native to California back then....

Basically, I left out all man made objects and inserted the trail to represent the future road...I figure if the road is there now then back then it was a route of travel and must have started as a trail...maybe it did maybe it didn't but since this isn't science class I'm going to go with "it did". Part of this painting is imagination, my view of how I percieve the past at this location. That grass on the right handside going into this small canyon was not there back in the 1800's. Pasadena and much of the rest of southern California was arid. Water for lawns and gardens and drinking water to support the millions of people who live there now came from up north via the California Aquaduct. The valleys below the mountains were strewn with boulders washed down from the canyons from heavy rains. I imagine the landscape in the valleys was laden with runoff ditches from the flood waters of rain and snow melt from heavy winter snows up in the San Gabriels. Pepper trees and palms were brought in by the spanish missionaries. If you look at the works by the early California Impressionsists starting around the turn of the century you can see painted records of what the land looked like around the San Gabriel and San Fernando Valleys...nothing like it looks today.

Anyway, here is my version of the scene...


Here are some details...why? because they look cool and you can see my mistakes up close! hahahaha.

Wednesday, May 28, 2008

Valley Trail

I did this painting mainly to practice more at painting trails through native grass. Trails are becoming very fun to paint. I am wanting to paint these types of scenes more and more. I enjoy pushing the distance in a valley scene and throwing in the trees randomly...this of course was another scene out of my head instead of using a reference photo. The joy of painting these is you don't become a slave, or even have to worry about becoming a slave, to a reference photo. There is such freedom in composing whatever you like in a scene and so these paintings develop pretty fast and I end up doing most of them Alla Prima. A fun one to do.

"Valley Trail"

9"x12" Oil on Canvas

Here are a couple of detail shots....


Wednesday, May 21, 2008

Another Nocturne!

"Moonlit Meadow" 11" X 14" Oil on Canvas

I did this nocturne to work on the various shades of night sky. Night skies are always handled so differently by various artists I have seen. Good thing, keeps them from getting boring and allows the viewer to "see" better. Actual night can be so dark at times. I have found myself really checking out the light and what you can see, detail and color wise, on moonlit nights. This was done Alla Prima, like a lot of my work lately, which is always a challenge and fun as hell!
Here are a couple of details....

Valley Eucalyptus

This has become yet another painting in what has practically become a series of paintings from imagination. I think lately I have been doing every other painting from imagination. Makes sense, you learn to draw things with a pencil from looking at them. Then, you begin to draw things from memory. Most people can remember what something looks like, a particular sunset at the beach or the view out of the car window when driving through the desert....the cool thing about being an artist is we can usually not only remember them in our minds but can draw or paint them from our minds. It's pretty snazzy being an artist. You have to enjoy these little things because you sure can't rely on enjoying the tons of money that comes rolling in from being an artist! hahahaha.
This particular one started out as just wanting to paint a sky using Cerulean blue instead of my usual Ultramarine Blue. Gives your sky a nice blue/green look. Throw in some white or slighly yellow clouds and you get an old look to your painting....I'm starting to love that look in my paintings. I threw in some lupine too for the fun of it and to practice suggesting flowering plants in my paintings....can't always be grass you know.

"Guardians"

11" X 14" Oil on Canvas


Some details...

Monday, May 19, 2008

Mojave Nocturne..the desert at night


The desert at night...if you have never been there to feel that you need to! Summers are anywhere from super cold to down-right hot! Still, it is pretty awesome being in the desert in the moonlight. Naturally, I couldn't wait to paint a scene from the Mojave desert which is located right over the mountains from where I grew up in Pasadena. Out here we call it the High Desert because it is up there elevation wise except for it's lowest part, Death Valley, which is below sea level and hot as heck! We also have other desert parts called the low desert...looks about the same too like where Palm Springs is, gets hot there too!
Anyway, this scene is off of a road crossing the desert called Pearblossom Hwy. In the distance you can see the back of the mountains that had snow on them at the time.

California Art Club Show

I received a call-to-artists notice for an upcoming show in Pasadena by the California Art Club of which I am a member. I entered 2 paintings hoping to get in on this show and just received word that both paintings were juried into the show. I was also notified that my painting of a mustard field down in Palos Verdes was selected by the jury for special recognition. This is not an awards show nor is money handed out so I'm assuming they just really liked the painting....always a good thing!
There will be a show reception that is open to the public so if you live within driving distance of Pasadena please come and say hi! Here are the show details....

Where - The Womens City Club of Pasadena, 160 N. Oakland Ave. Pasadena, CA
When - The show runs June 23 - November 26 2008
Reception - Saturday, July 12, 5-7PM

I'm pretty jazzed about the nocturne, "The Foot Trail", getting into the show. It is my second nocturne ever, the first being a terrible version of a barn on our property. So far I've done 4 nocturnes including a desert nocturne. I have totally learned something on each one and each nocturne gets better and better I think. If you want to break out of the rut of your everyday paintings do a nocturne! It's a whole new set of rules but so fun to do.

Wednesday, April 30, 2008

Paint a Tree...Made Easy

Eucalyptus Trees, very large and very cool to paint. Well, in California they are painted all the time. I'm going to show you how to paint one...why? Because if you can paint one of these you can pretty much do most trees in your paintings. The principle is the same. Basically, a tree is a large mass of darks...mid-values...highlights...branches & skyholes and in that order. Trees are not big green pom poms with a brown trunk popping out of the bottom. That's what you paint in the 5th grade. We are going to paint a killer eucalyptus tree that will look great and improve your tree work....thus improving your paintings and skill level.
There are other trees that look quite differently but can be approached in very much the same manner as we are going to approach this Euc. So, here we go........


This is a painting I've just finished but took the time to photograph my tree work to help others that are interested. I've finished my sky work first...I left the area where the tree would be so I don't have to paint over wet paint. If you sketch your tree don't worry about a little sky paint going over the lines...that's ok.
Step 1 Blocking in the Darks...
First I will mix a very dark mix of French Ultramarine Blue/Alizarin Crimson and a dab of Cadmium Yellow Pale. This is my dark mix but you can use whatever you'd like to get a dark mix of green or reddish green or even blue. I go for reddish green. I add Copal Painting Medium made by Grumbacher to all of my mixes. I usually add 5 or 6 drops off of my palette knife or just pour the drops onto the paint mix. You can add as much as you want but remember, the more you add the more watery & transparent it becomes...like a wash. This medium aids in drying time of oil paint and leaves a nice shine to your paint instead of the usual flat look of dired oil paint.
I can either block in the entire tree or just the areas where the dark show through the mids. I've done both so experiment and see which method you like. Here, I've darkend in the entire tree area.

Now, on this tree I am going to have the upper half of the tree catching more light and the lower section in shadows. I like the darks here but I want the bottom really dark so I'm going to add a little more of my dark mix down there to darken that part more. That gets me to this point...

That look pretty good so lets get started adding the mids....

Step 2 Adding the Mid Values...

...or Middle values which are a lower value green mix. In other words trees are like dark green, green and yellow but we adjust all that depending on the tree. Since there are all of these color variations with trees I just call them darks, mids and highlights. My mid green is going to be the same color combination as the darks mix but with less Alizarin and more Cad Yellow Pale. Here is what it looks like as we begin...

I began by painting thicker mids at the top of the tree and thinner towards the bottom with a light touch of the brush. Most of the mids will be covered by highlights but you can choose to leave as much of your mids showing as you like. The mids here will show as a slight ring around my highlights.

Step 3..Adding Highlights...

Here you can see how I have blended the highlight mix to the sunlit area. This mix is the same as before but with more Cad Yellow Pale. I faded my highlights from top to bottom and left to right. My light sorce is from the left so I'm leaving the darker colors to suggest shade on the right side of the tree. Step 4 Skyholes and Trunks...

After the foliage is done we need to add some light peeking through the trees and to hep us shape our tree better. I use just a slightly darker shade of my sky mix to add skyholes. For turnks and branches I've just added light strokes with white and a bit of my dark mix added.

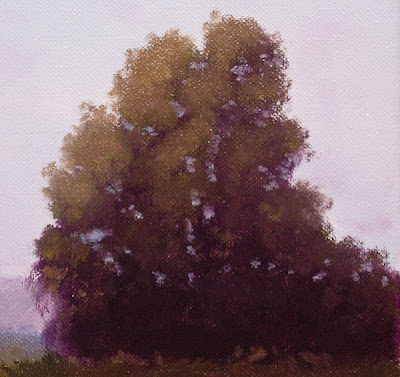
and now the trunks and branches...


The only thing I do after this step is to go around and tweak the tree up...a dab of color altered here and there, some edge work etc...just little things to make it look good.

I think that's a pretty convincing Eucalyptus tree...not the pom pom type of Euc, more the bush looking one that my neighbor has. I have both on my property. So, these are not as hard as you might have thought. Remember, darks, mids, highlights, skyholes and trunks...that's it. Below is how the tree looks in the competed painting....Hope you got something out of this and give it a try.

"Prelude To Evening"

9"x12"

Wednesday, April 16, 2008

A Nocturne

I don't know why but I really have this thing for nocturnes...I love them. I tried doing one once but it was horrible. Night colors are so different to day colors and I just didn't get it. I loved seeing the works of Whistler and Grandville Redmond and lots of others. They have such an eerie feeling to them, and although I'm not an eerie kind of guy, I'm attracted to them all the same. At the house of a painter friend I saw some nocturnes he had done...really nice ones. Like most of the other nocturnes I had seen before I studied how he handled the scene. Always taking mental notes which is what I do constantly when looking at other artists work.

So....last night before going to bed I decided I might as well try one since I had 2 8"x10"'s gessoed up and ready to go. An 8x10 is not a huge canvas to lose if the painting goes sour...besides, I'm good enough now to recognize a bad piece as it progresses and can wipe that baby down in a heartbeat while the paint is still wet. Frugal...that's what my middle name should have been.

This scene I painted does not exists anywhere except in my head. I wanted sky, a distant mountain range, a big tree and some smaller ones behind it to create depth. There is a tree close to where I live on a slanted hilside that I took pics of the other day...again, and I just tried to visualize it when doing this one. I'm still not the expert at painting nocturnes but I figured the use of blues and greys would mute my colors enough to read as night colors. My tree here probably has too much color in it and in the future I'll try going darker there. The way different artists handle nocturnes is kind of strange...some paint them really dark which makes sense to me...it is night time, but others paint them really bright. Whistler handled them both ways so I'll try the same...the guy was pretty damned good at painting so I have no problem following his lead in variety rules.

I'd like to explain my color mixes better but honestly so much of it was done on the fly I really would have a hard time doing it. I used my usual dark mix for the tree and then added slightly more yellow and grey to make the tree highlights....well, mids because there is no highlights on the tree. The grasses were just using this mid color and maybe adding some barely brighter grey or greens to them in places. Seat of the pants type or work there. The trail started out as just a splash of yellow ochre dulled with dark grey as just a small foreground highlight but my mix was too bright and I used too large of a brush. The first thing that came to mind was it looked like a flat patch of dirt in the dark to me and then I thought "trail"....a dew additional strokes and trail is was. Hey, it's my imagination so I can do what I want there.

Anyway...here is my finished piece which now sits drying on a shelf and I'm pretty happy with it...turned out much better than I thought and most of it done Alla Prima last night. I did however mess with the foreground grasses some more this monring so I can't really call it an alla prima totally...but mostly.

"The Foot Trail"


8"x10" Oil on canvas

and some details....

Monday, April 07, 2008

Painting Portugese Bend


OK.....actually painting the wild mustard at Portugese Bend...which is an area of the Palos Verdes peninsula which is the boot looking piece of land just south of Los Angeles along the coast. It's a beautiful area that I have driven through many times. I was recently invited by friend and fellow painter Bruce, (boomerbeach), from WC to go do some plein air painting and catch the wild mustard in full bloom before it's gone. The mustard here grows to 6 feet tall and some of the areas we walked you were hidden in the mustard. We had a great time.

By the time I had gotten there a lot of painters, including Bruce and Bill Wray, were already out painting. We had about 10 painters show up. I ran into Bill when finishing my painting as he stalked out killer reference shots with his camera. I saw Bruce later at dinner. This was not an offical plein air painting deal, just a group of people getting together to paint and have dinner later. Here are some pics from the day.


The view to the top of the peninsula Mustard abounds....


Me, working it up on the 9"x12" panel. This was a great spot. The field in from of me used to be a bean field way back in the 40's.


Walk to the edge of the bean field and this would be your view down onto the Pacific Ocean. Is this place awesome or what!

That's me, all finished up with my painting. I have done 2 other paintings in the studio with mustard fields and used a brush to do the mustard. On this one I decided to see what using a knife would look like. That decision was brought on by me rubbing on a tinted ground that didn't quite dry and I was worried painting in the mustard would blend too much with the undercoated paint. I think I prefer the brush method though....next time, no tinted ground.

This is where I chose to paint...right off the road next to the beanfield. Took lots of reference shots so I'll be doing more paintings from this area. The cliffs down along the beach are totally awesome and I plan on returning to do some PA work there once I get painting cliffs down to a science...hahaha.


the finished painting.....needs a brush for that mustard!
and a detail shot.....

Tuesday, April 01, 2008

Adding Color...Flowers

It is almost Springtime here in Solvang...located in the Santa Ynez Valley. This year it hit me...COLOR! I do a lot of driving and have really noticed the color to the landscape that native plants bring. California Poppies, Wild Mustard...I'll do Blue Lupine soon too. Here are some new paintings that I sprinkled flowers in which brings some added color to my usually subtle work. Poppies with a yellowish tint

Wild Mustard in a field near San Luis Obispo


Nice orange California Poppies in Santa Ynez

An Evening Scene

Well, I painted this scene before using a square format, 24"x24". Worked real well and sold in the first show I had it in December in Gallery Los Olivos. It now resides in Kentucky somehwere. I liked the original but felt the colors I used in that one were too light so I decided to paint it again in a much smaller size, 9"x12", and go darker. I recently painted some other smaller 8"x10"'s and they were darker and looked really cool in these new black plein air frames I've been buying. I recently bought a boatload of Windsor&Newton canvases from Jerry's while they were on sale so I whipped this one out today...Alla Prima, in about 3 hours.

I'm loving Alla Prima work and discovered the best way to do one is to not plan to do one! Sneaking up on Alla Prima work is my best way of doing one because when I say I'm going to do one for sure something goes wrong and I work 2 days doing it. Alla Prima - is completing a painting in one sitting. Why do Alla Prima? Because it teaches you what you need to know to paint fast so when you go outdoors to do Plein Air you are only dealing with capturing the local color and light...knowing how to mix fast and get the colors you want is learned doing Alla Prima inside the studio. Knowing how to control your painting techniques is also learned inside....otherwise you are just asking for hours spent swatting flies, wasting paint and coming home with less than a finished painting.

"Evening"

9"x12" Oil on Canvas